My first home-built telescope was the trackball.
As the name implies, it tracks the sky while I observe, so I don't have
to nudge it along like a traditional Dobsonian. I built several
trackballs, but in 2010 Kathy and I bought Mel Bartels's
fabulous 20" Tri-Dob. The Tri-Dob is an amazing telescope,
lightweight and portable (it fits in our Volkswagen Beetle!) and
boasting one of the best mirrors on the planet, but it had one downside
that always bugged me: it didn't track.
Then I built my 12.5" binocular scope and that didn't track,
either. My biggest and best telescopes were pushers. I had been spoiled
by the trackball scopes, though, and kept thinking of ways to make the
two big scopes track, too. I thought about equatorial platforms, but the
scopes sat on a big (38" diameter) ground ring and that would require an
equally big equatorial platform, which would add as much as a foot to
the eyepiece height.We already had to use a ladder with the Tri-Dob, and
I wasn't willing to go even higher just for tracking.
I got to thinking about that big ground ring, though, and why
it was so beefy. It was made rigid so the traditional Dobsonian rocker
box could be reduced to a "flex rocker" that served the same purpose
with a fraction of the materials and height of a traditional rocker.
What if I could use the same ground ring for stiffness and reduce the
traditional equatorial platform to an equally small "flex EQ platform"
beneath it?
An equatorial platform requires only three elements: a pivot
point and two curved runners that glide across roller bearings. Replace
one of the roller bearings with a drive axle and you've got equatorial
tracking motion. There was no reason in the world why I couldn't reduce
the platform to those basic components. All I needed was a framework to
hold the pivot point and the bearings in place.
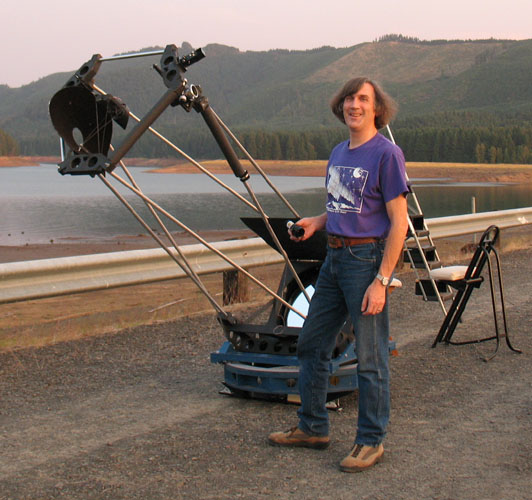
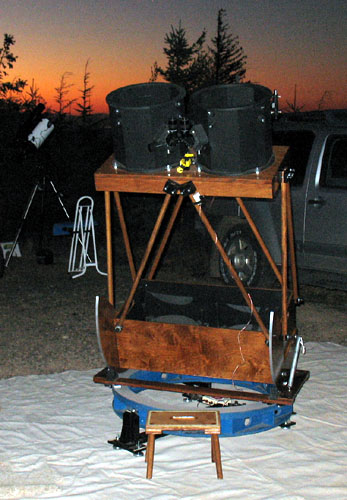
I set out to build just that, and the result is what you see
in the photo at left. That's Mel's Tri-Dob on its blue flex rocker and
blue ground ring, and there's my "flex EQ platform" under the ground
ring. You hardly notice it there, and that's the point. It tucks in out
of the way and it only adds 4" to the height of the scope. And yes, it
tracks like a dream.
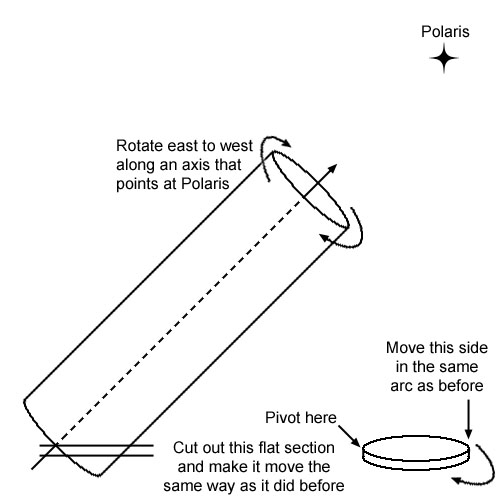
How does an equatorial platform work? Imagine a cylinder with its axis
aimed at Polaris, the north star. (Or Sigma Octantis if you're in the
southern hemisphere.) If you rotate the cylinder along that polar axis
so it turns once around per day from east to west, it will remain
stationary with respect to the stars. Anything you mount on the cylinder
also remains stationary with respect to the stars. That's how
traditional German Equatorial Mounts work: the polar axis down inside
the mount housing is our cylinder. In our thought experiment let's just
expand that cylinder so it's a big, monstrous tree trunk ten feet in
diameter. If you live at 44 degrees north latitude, like I do, Polaris
is 44 degrees up in the northern sky and the cylinder would be angled
upward at 44 degrees.
Now take a saw and cut off most of the cylinder at an angle parallel to
the ground, leaving a flat-topped section of it. If the remaining piece
of cylinder continues to move as before, then anything sitting on that
flat platform — say a Dobsonian telescope — will also track the stars.
 The downside to an EQ platform is
that you only get an hour or so of motion before the tilt becomes too
extreme for your scope to stay on the platform. That's not a big deal —
you just grab the edge of the platform and pull it back to the "start"
position and get another hour of tracking — but you do have to get used
to that or you'll find yourself studying an object at high power when
your tracking reaches its limit and your object zooms out of the field
like it does with a regular dobsonian scope. Or worse: if your drive
doesn't have a limit switch to stop the motor before it reaches the end
of the runners, the platform can drive itself right off the bearings and
your scope can fall over. Not good. Install a limit switch. More on that
below.
The downside to an EQ platform is
that you only get an hour or so of motion before the tilt becomes too
extreme for your scope to stay on the platform. That's not a big deal —
you just grab the edge of the platform and pull it back to the "start"
position and get another hour of tracking — but you do have to get used
to that or you'll find yourself studying an object at high power when
your tracking reaches its limit and your object zooms out of the field
like it does with a regular dobsonian scope. Or worse: if your drive
doesn't have a limit switch to stop the motor before it reaches the end
of the runners, the platform can drive itself right off the bearings and
your scope can fall over. Not good. Install a limit switch. More on that
below.
The ground ring that Mel built for the Tri-Dob became the flat section of cylinder from the thought experiment above. It pivots on the point you see in the foreground of the photo to the left (detail of the pivot axle below), and it moves along the curved runners that you can see under the ring in back (see animation above left and detail below).
 The motion is complex. It's not
a simple tilt, nor is it simple side-to-side motion. It's a combination
of both. You can see it in the animated gif above left. Figuring out the
radius and the angle of the arcs can require some serious math...or you
can do what I did and pound a nail into the edge of the ring where the
pivot goes, rest that nail head on a concrete block, and suspend the
ring from a rope draped over a camera tripod whose head is in line
between the pivot point and Polaris. That put the rope's apex on the
axis of the theoretical cylinder, which meant when I swung the ring from
side to side it moved just like it was supposed to. I taped pieces of
cardboard to the bottom of the ring and held a pencil up to them while I
moved the ring back and forth. The pencil drew the arc that it would
have taken me days (and calculus) to figure out mathematically.
The motion is complex. It's not
a simple tilt, nor is it simple side-to-side motion. It's a combination
of both. You can see it in the animated gif above left. Figuring out the
radius and the angle of the arcs can require some serious math...or you
can do what I did and pound a nail into the edge of the ring where the
pivot goes, rest that nail head on a concrete block, and suspend the
ring from a rope draped over a camera tripod whose head is in line
between the pivot point and Polaris. That put the rope's apex on the
axis of the theoretical cylinder, which meant when I swung the ring from
side to side it moved just like it was supposed to. I taped pieces of
cardboard to the bottom of the ring and held a pencil up to them while I
moved the ring back and forth. The pencil drew the arc that it would
have taken me days (and calculus) to figure out mathematically.
Here's how I attached the runners to the bottom of the ring. I drilled
holes in the runners and the ring, and used 1/4" rods to pin the runners
in place. They're not bolted or anything; friction does a fine job of
keeping them in place while I set the ring on the rest of the platform,
and gravity keeps everything together after that.
The runners are just made from pieces of 2 x 4. Note
that they're clad with steel on the bottom so the roller bearings that
they rest on won't dent the wood. (Cheap metal rulers work well for
this.)
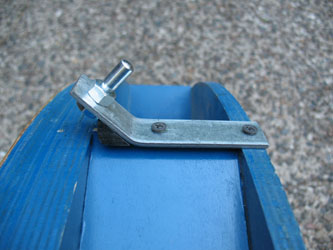
Here's the south pivot point. It fits into a skateboard
bearing held at the angle of my latitude in that big black block you see
above and below. There's a metal plate behind the bearing that the end
of the pin rests against. Note how the end is rounded so there's less
friction on the plate. (I also put a dab of wheel bearing grease on the
plate).
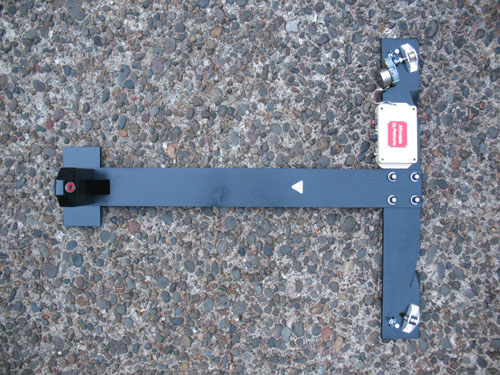
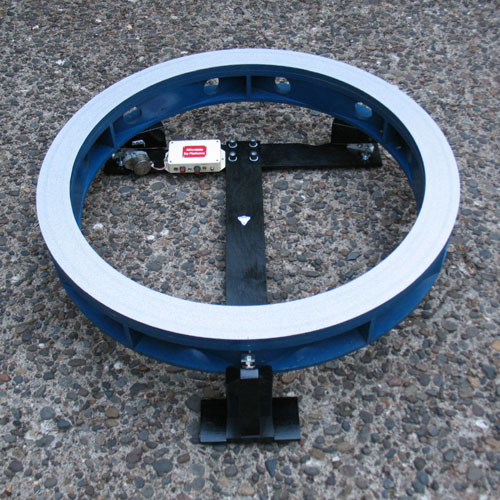
This photo shows how the bearings are situated. The south pivot bearing
is angled upward toward Polaris.
Note that the other two bearings are not aimed at each other. Rather
their axles are aimed at the pivot point. The upper one on this photo
has the drive motor attached. It's a step motor that I bought online as
part of a kit for building a traditional equatorial platform. (The
company was called "Affordable Equatorial Platforms" and unfortunately
isn't operating anymore as far as I know, but you can buy step motors
and drive electronics lots of other places.)
That little triangle in the middle of the "T" is a bubble level. You do need to keep the platform reasonably level. (I installed leveling feet after this photo was taken.)
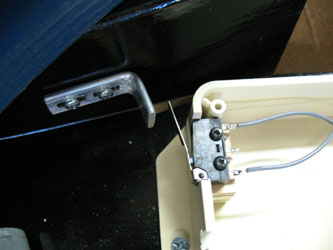 As I described above, I installed a limit switch on the
motor so it wouldn't keep trying to push the platform when it ran out of
runner. It's just a micro-switch that cuts the power when the runner
reaches the end of its travel. I get 50 minutes of tracking before I
have to reset, and resetting is as simple as grabbing the west edge of
the ground ring and lifting it upward. The runners will slide back to
their starting position (I have stops to keep them from going past), I
let go, and it's tracking again. Of course I have to re-aim the scope
when I do that, but if I remember to reset the platform every time I go
to a new object I seldom run out of tracking before I'm done
looking at that object.
As I described above, I installed a limit switch on the
motor so it wouldn't keep trying to push the platform when it ran out of
runner. It's just a micro-switch that cuts the power when the runner
reaches the end of its travel. I get 50 minutes of tracking before I
have to reset, and resetting is as simple as grabbing the west edge of
the ground ring and lifting it upward. The runners will slide back to
their starting position (I have stops to keep them from going past), I
let go, and it's tracking again. Of course I have to re-aim the scope
when I do that, but if I remember to reset the platform every time I go
to a new object I seldom run out of tracking before I'm done
looking at that object.
It's simple to set up: set the flex platform (the T-shaped
bit) on the ground with the pivot point to the south. Level it to within
a few degrees. Put the runners on the bottom of the ground ring, then
flip the ground ring over and put the pivot axle in the pivot bearing
hole, then set the runners down on their bearings. Set the telescope's
flex rocker on the ground ring, set the telescope on the flex rocker,
switch on the motor and you're tracking. (In that regard, it's like my
trackball design. No clutches to fool with! Just aim the scope at your
target and watch it stay put.)
If your polar alignment or your level is off by more than a
few degrees, you'll notice a little image drift to the north or south.
An EQ platform can be drift-aligned like any other equatorial mount, so
it's a simple matter to nudge the platform left and right or shim it up
or down until it's tracking right. After a few setups, though, you get
the hang of doing it right the first time and seldom have to fiddle with
realigning it.
Likewise, my drive electronics came with a hand controller
that lets me fine-tune the drive speed, so I can put in a high-power
eyepiece and set the speed so the object doesn't move, then ignore that
control for the rest of the night. The angular
rate for an object is the same everywhere in the sky, and this is a true
equatorial drive, so the tracking rate is the same everywhere. No field
rotation, either. You can photograph with it. Yeah. :-)
Here's my binocular scope set up on the same platform and
ground ring. You haven't lived until you've looked at the Moon or the
Orion Nebula in a huge pair of binoculars that track! You can lose yourself in
the view for an hour if you want to and it just hangs there in front of
you, unmoving.
Some technical details for people who are actually thinking of building one of these:
The closer to the equator you live, the lower Polaris is in your sky (or Octans if you're in the southern hemisphere). That means your imaginary cylinder is going to be tilted more than mine at 44 degrees north. That's going to put your south pivot point farther away from the edge of the ground ring (unless you have a really big ground ring). You could build an extension to your groung ring to reach your pivot point, or you could make the pivot point virtual and use runners on the south end as well as the north end. Many equatorial platforms do this and there are designs for them all over the Internet, so I won't go into them here other than to say that I'm pretty sure the flex-platform idea would work just as well with them as it does with the pivot-point type.Note also that your scope's center of gravity (actually the center of gravity of the scope plus its flex rocker and ground ring) should lie along the polar axis between your pivot point (whether real or virtual) and Polaris. A taller scope will raise that center of gravity upward, which will raise the polar axis upward and push your pivot point away from the ground ring. A short scope (or a high latitude) may put your pivot point underneath or even inside the ground ring. Underneath would be ideal!